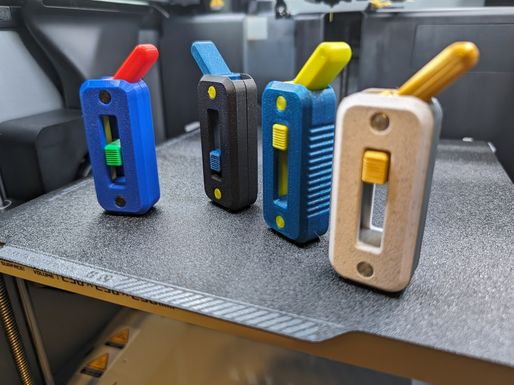


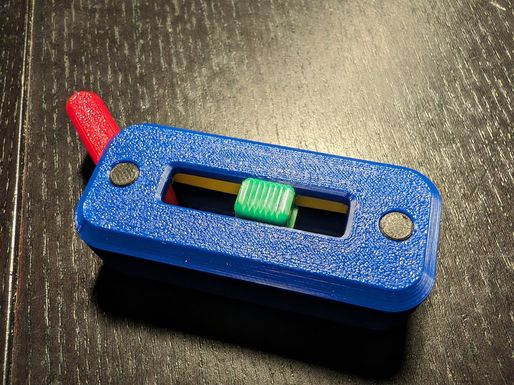
Adjustable Fidget Toggle Switch
37
0
37
0
Marc3DP
@Marc3DP| Designs: | 370 |
| Downloads: | 27097 |
| Followers: | 0 |
| About me: | My name is Martin, better known as Marc3DP. I'm a huge 3d printing enthusiast and a co-creator of 3D PrintShelf . I have also a Youtube channel about 3D printing models https://www.youtube.com/c/Marc3DP |
Product description
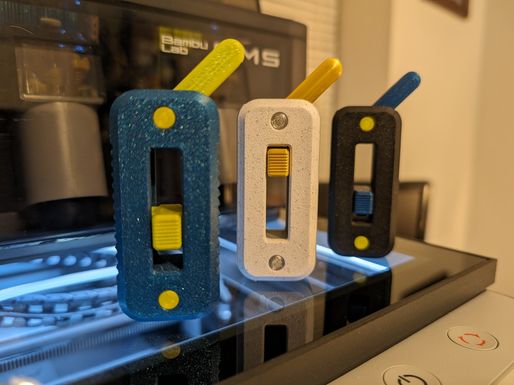
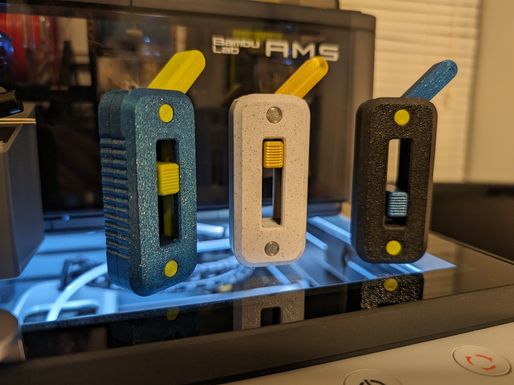
Adjustable Fidget Toggle Switch bykriswillcode
After seeing many people's problems with my previous fidget switch's spring, I decided to create a new variant that allows you to adjust the spring's tension whenever you want. Some days you may want a soft, tactile click; other days you may want a loud, snappy click - this fidget does both! And it even has a more ergonomic form factor!
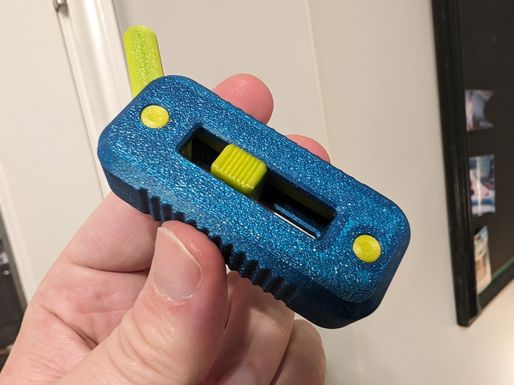
This little switch consists of just eight parts! And, just like my previous switch, you'll need to print two of some parts. The body of the switch also has two options, because who doesn't like choices?
⚠ Heads up, hot shot!
This is a tricky print. This print has a few small pieces that don't work with brims. These have limited bed contact, so you'll need nearly perfect bed adhesion. Because of the small tolerances in this print, your flow rate must also be perfect. Finally, if your printer has any noticeable elephant's foot, then forget about printing this.
Printing settings
Settings
- Designed for a 0.4mm nozzle
- 0.16mm or 0.2mm layer height
- 3 walls
- ≥5 top/bottom layers
- 20% infill (but more feels better)
- Slice with Arachne if available
All files should be in the correct orientation to print. Supports are not required, but a brim will help when printing the pegs. I do not recommend using a brim on the springs as it's difficult to remove and any brim remnants will interfere with the action of the switch.
What to Print
| Part | Qty | Notes |
|---|---|---|
| Body | 2 | There's two options: smooth or grip; print two of the same option |
| Peg | 2 | A brim helps here! |
| Spring | 2 | Don't use a brim on these! |
| Toggle | 1 | |
| Slider | 1 | A lower layer height is preferred here: 0.16mm or 0.12mm |
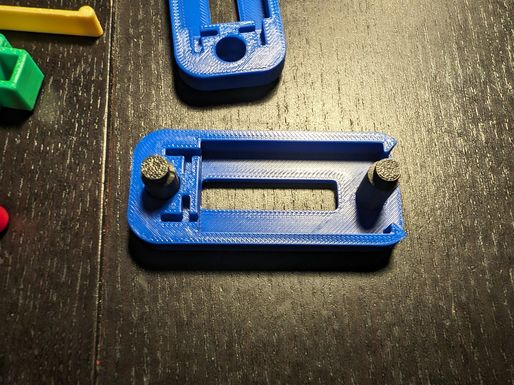
Assembly
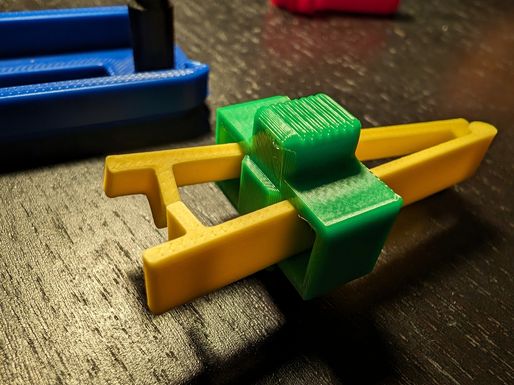
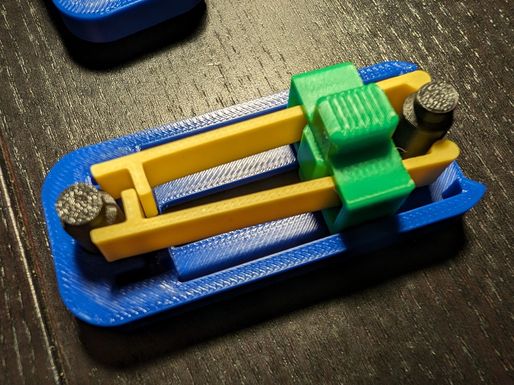
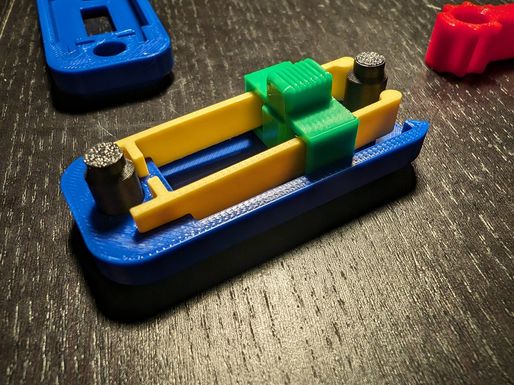
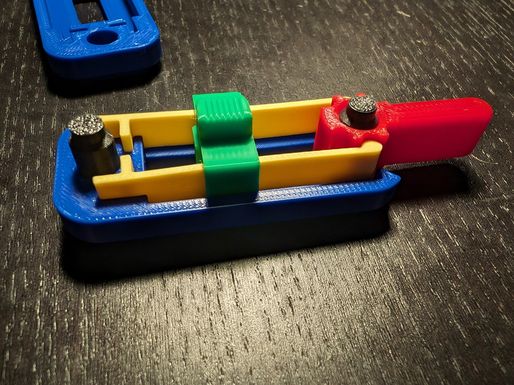
The last 7 photos demonstrate the assembly process.
- Test your prints: Place the slider between the two body halves and verify the slider can slide freely. Then, place a peg in the toggle and verify the toggle can rotate freely.
- Insert both pegs into one side of the body. These will be extremely tight (that's intentional!!!). If the pegs absolutely won't fit, you might need to reprint them with the X and Y scale reduced by 0.2 to 0.4% (99.8 to 99.6%).
- Place the springs into the slider and check the orientation: the "arms" of the springs should point towards each other, and the "bump" on the slider should point towards the arms.
- Move the slider towards the rounded ends of the springs and carefully press the springs into the body half from step 2. The springs should be parallel with the bottom of the body.
- Move the slider away from the rounded ends and slip the toggle on the peg. Use a finger to separate the springs for easy placement.
- Check the motion of the slider and the toggle. If everything looks good, place the other half of the body on top and press the two body halves together. Be sure the springs are properly aligned into their respective slots.
- You're done! Flick away!
Protips
- This switch is not designed to be disassembled, so good luck with that.
- A drop of lube between the toggle and the peg works great depending on your filament(s).
- A small amount of beeswax applied to the outside of the springs helps if you find the slider difficult to move. But, the slider may shift during some intense switch flipping.
- The pegs require some force to properly insert, but they have to hold the switch together. No other part (e.g. the springs) should require any significant force.
- If you're rocking an AMS, use "Others > Print sequence > By object" to quickly print all parts on one build plate while using different filaments!
If you print one of these switches, please post a make: I love seeing all of your creative color combinations!
This is a re-upload of the model made by kriswillcode➡ https://makerworld.com/en/models/66670#profileId-70512. I have the creator's consent to use the photos and description.
License
❌ Sharing without ATTRIBUTION
✔️ Remix Culture allowed
❌ Commercial Use
❌ Free Cultural Works
❌ Meets Open Definition
This work is licensed under a Creative Commons (4.0 International License) Attribution—Noncommercial—Share Alike
https://creativecommons.org/licenses/by-nc-sa/4.0/
Details parameters
<h4>Settings</h4><ul style="list-style-type:disc;"><li>Designed for a 0.4mm nozzle</li><li>0.16mm or 0.2mm layer height</li><li>3 walls</li><li>≥5 top/bottom layers</li><li>20% infill (but more <i>feels</i> better)</li><li>Slice with Arachne if available</li></ul><p style="margin-left:0px;">All files should be in the correct orientation to print. Supports are not required, but a brim will help when printing the pegs. I do not recommend using a brim on the springs as it's difficult to remove and any brim remnants will interfere with the action of the switch.</p><p style="margin-left:0px;"> </p><h4>What to Print</h4><figure class="table"><table style="border:1px double rgb(179, 179, 179);"><thead><tr><th style="background-color:rgba(0, 0, 0, 0.05);border:1px solid rgb(191, 191, 191);padding:0.4em;"><strong>Part</strong></th><th style="background-color:rgba(0, 0, 0, 0.05);border:1px solid rgb(191, 191, 191);padding:0.4em;"><strong>Qty</strong></th><th style="background-color:rgba(0, 0, 0, 0.05);border:1px solid rgb(191, 191, 191);padding:0.4em;"><strong>Notes</strong></th></tr></thead><tbody><tr><td style="border:1px solid rgb(191, 191, 191);padding:0.4em;">Body</td><td style="border:1px solid rgb(191, 191, 191);padding:0.4em;">2</td><td style="border:1px solid rgb(191, 191, 191);padding:0.4em;">There's two options: smooth or grip; print two of the same option</td></tr><tr><td style="border:1px solid rgb(191, 191, 191);padding:0.4em;">Peg</td><td style="border:1px solid rgb(191, 191, 191);padding:0.4em;">2</td><td style="border:1px solid rgb(191, 191, 191);padding:0.4em;">A brim helps here!</td></tr><tr><td style="border:1px solid rgb(191, 191, 191);padding:0.4em;">Spring</td><td style="border:1px solid rgb(191, 191, 191);padding:0.4em;">2</td><td style="border:1px solid rgb(191, 191, 191);padding:0.4em;">Don't use a brim on these!</td></tr><tr><td style="border:1px solid rgb(191, 191, 191);padding:0.4em;">Toggle</td><td style="border:1px solid rgb(191, 191, 191);padding:0.4em;">1</td><td style="border:1px solid rgb(191, 191, 191);padding:0.4em;"> </td></tr><tr><td style="border:1px solid rgb(191, 191, 191);padding:0.4em;">Slider</td><td style="border:1px solid rgb(191, 191, 191);padding:0.4em;">1</td><td style="border:1px solid rgb(191, 191, 191);padding:0.4em;">A lower layer height is preferred here: 0.16mm or 0.12mm</td></tr></tbody></table></figure><p style="margin-left:0px;"> </p><h4>Assembly</h4><p style="margin-left:0px;">The last 7 photos demonstrate the assembly process.</p><ol style="list-style-type:decimal;"><li>Test your prints: Place the slider between the two body halves and verify the slider can slide freely. Then, place a peg in the toggle and verify the toggle can rotate freely.</li><li>Insert both pegs into one side of the body. These will be extremely tight (that's intentional!!!). If the pegs absolutely won't fit, you might need to reprint them with the X and Y scale reduced by 0.2 to 0.4% (99.8 to 99.6%).</li><li>Place the springs into the slider and check the orientation: the "arms" of the springs should point towards each other, and the "bump" on the slider should point towards the arms.</li><li>Move the slider towards the rounded ends of the springs and carefully press the springs into the body half from step 2. The springs should be parallel with the bottom of the body.</li><li>Move the slider away from the rounded ends and slip the toggle on the peg. Use a finger to separate the springs for easy placement.</li><li>Check the motion of the slider and the toggle. If everything looks good, place the other half of the body on top and press the two body halves together. Be sure the springs are properly aligned into their respective slots.</li><li>You're done! Flick away!</li></ol><h4> </h4><h4>Protips</h4><ul style="list-style-type:disc;"><li>This switch is not designed to be disassembled, so good luck with that.</li><li>A drop of lube between the toggle and the peg works great depending on your filament(s).</li><li>A small amount of beeswax applied to the outside of the springs helps if you find the slider difficult to move. <i>But</i>, the slider may shift during some intense switch flipping.</li><li>The pegs require some force to properly insert, but they have to hold the switch together. No other part (e.g. the springs) should require any significant force.</li><li>If you're rocking an AMS, use "Others > Print sequence > By object" to quickly print all parts on one build plate while using different filaments!</li></ul><p style="margin-left:0px;"> </p><p style="margin-left:0px;">If you print one of these switches, please post a make: I love seeing all of your creative color combinations!</p><p style="margin-left:0px;"> </p><p>This is a re-upload of the model made by <a href="https://makerworld.com/en/@kriswillcode"><span style="color:hsl(240,75%,60%);"><strong>kriswillcode</strong></span></a><span style="color:hsl(240,75%,60%);"><strong> </strong></span>➡ <a href="https://makerworld.com/en/models/66670#profileId-70512">https://makerworld.com/en/models/66670#profileId-70512</a>. I have the creator's consent to use the photos and description.</p>
Other information
| Created on | May 7, 2024, 7:51 p.m. |
|---|---|
| Last edition | May 19, 2024, 3:37 p.m. |
| Added by | @Marc3DP |
| Category | Toys & Games |
| License dates | Yes |
| Product status | Active |
| Downloads | 37 |
|---|---|
| Rating | 0.0 |
| Number of likes | 0 |
Customer reviews
0.0 out of 50 global ratingsReview this product
Share your thoughts with other customers.
Reviews (0)
No one has added a comment yet
No one has commented on this product yet. If you downloaded this product or like what you see, please rate it. Comments are very useful for other users. Build a community with our website today!